

Summary
A reasonable tech stack for a website in 2022 looks like:
- Hugo (website)
- Beampipe.io (statistics)
- S3 (Hosting)
- CloudFront (CDN)
- Route53 (Domain name)
A short custom bash script (deployment)- Code Pipeline (Deployment)
With a total price of ~$1.2/month, including the yearly cost of domain name renewal (which is not specific to this tech-stack). It also has zero maintenance and allows for focusing on producing content.
Documentation for setting most of this up can be found here
Introduction
It is a well-established idea these days that web development is difficult. Generally, this notion stems
from the fact that a lot of web development projects gets their tooling and processes from the web app-space.
This generally means that they will have very complex build systems, use a lot of dependencies, and generally make use of some library/framework with its own programming model (common examples includes React and Angular). This problem is so common that people are making satiric YouTube videos [1] about it.
It is easy to see how someone that is completely new to web development would be put off by this relatively high entrance bar. However, a lot (to not say most) of websites today will not be large enterprise apps with a lot of dynamic user interactions and hundreds of developers and thus won’t need all the fuzz from above
[2].
As someone who works in projects like the ones described above daily (and have been for the last couple of years), I consider myself well versed with these technologies. However, when I finally got around to build my own personal website (the one that you are currently on), even I found myself wanting to look for something easier and simpler. In this post, I will describe the tech stack that this site uses, and the reasoning behind the choices I made. As this is not a how to guide, but rather an account for my own choices the target audience for this text would be other developers who are interested in building a simple website and looking for inspiration on how to get started.
Chosing a techstack
When choosing technologies, it is great to consider what your requirements are. For my website, the most important considerations, in no particular order, were the following:
- Cheap hosting
- Content focused work flow
- Nice look
- Follow best practices
- Minimal maintenance
- Custom domain name
- Usage statistics without tracking
Pretty early on, I made the decision that this website will be hosted as a static site on AWS S3. A decision made since it is extremely cheap. You pay $0.023 per GB and month (up to 50TB) for hosting, and then you pay for the traffic that your site receives [3]. So, if your site does not receive any traffic, you basically have free hosting. Other factors that went into the decision to choose S3 is that it does not get in the way of fulfilling any of the other requirements, I also regularly work with AWS in my day job, which of course played into the decision as well.
With hosting covered, the next step was to figure out how to build the view-layer. The actual website. My decision to choose S3 for hosting has a large impact on this decision. Since S3 only offers static hosting, classical CMS solutions such as WordPress are out of question. Not that I was particularly sad about the inability to run WordPress, after all, it is 2022 and I felt like it was time for me to try something new. The next thing I considered was to use one of the hip and cool new JS frameworks, whichever is coolest right now. The drawback of choosing such a solution, is that all of them would violate at least two of the above criteria. A page built with a modern web framework is not “minimal maintenance” as there are a multitude of dependencies that will have to be up to date. And considering that I expect to have quite some time between posts, I was quite afraid that such a solution would end up in a state where, whenever I wanted to write a post, I would never get around to do it as I would be stuck with updating dependencies instead. Coding a website from scratch would also mean that I would have to put a lot of effort into making it look nice and following best practices, not to speak on the amount of work I would have to put in to make it possible to focus on the content the next time I had inspiration enough for a post. I have made that mistake before when attempting to build personal websites.
With all of this in mind, I decided to go with a static site generator (SSG). That is, a tool that lets you define your website in terms of templates, and your data in some data format (e.g., Markdown) and which then compiles this into “real” html/css/js files that can be served directly to the browser. Which is great because it plays perfectly together with my choice of hosting solution. As with any other kind of web framework there are a ton of SSGs out there.
![]()
I ended up choosing Hugo [4], mainly because it did not require any specific stack for either installation or for writing the page, as well as for the large number of themes available. So, I could choose a theme that I thought looked good in general, then I could just make some tweaks to the theme to get it exactly how I wanted it. As a bonus, the theme I chose also came optimized for best practices and accessibility. Another benefit of the separation between templates and content made by Hugo is that if I in the future want a new design of the page, it can be replaced without any changes to the data. Well, that is the theory at least. It remains to be seen if that really is the case.
With this, I had almost all my requirements fulfilled. However, I still had to address the question of a custom domain name. The default URL when hosting pages on S3 is of the format: <bucket-name>.s3-website.eu-north-1.amazonaws.com. However, I wanted to host my site on the domain linuslagerhjelm.se. Fortunately, this was fairly simple to achieve as, since I chose S3 for hosting, I had access to all other AWS services. What I could to then, was to transfer a domain that I bought elsewhere into Route53. Route53 supports something that AWS calls “alias records” which allows you to create records for the zone apex, which in this case means that I could create a record that points linuslagerhjelm.se to my website hosted in S3. The only “downside” with this solution is that it will not work with https by default, as that would require a custom certificate which includes linuslagerhjelm.se in either the CN or SAN field. This is a problem that is easily solvable by making use of the AWS service CloudFront, which is a CDN solution that supports the installation of custom certificates.
This is a “downside” within quotation marks as it is not really a bad thing to put your page behind a CDN, quite the opposite actually. I did however feel that it was somewhat of an overkill for this page, even though CloudFront also is a “pay as you go” service, and thus very cheap if you do not have much traffic. Another benefit with this solution though is that both the domain name registration and certificate is managed by AWS so they will make sure that they are both renewed when needed which further reduces the maintenance of the site.
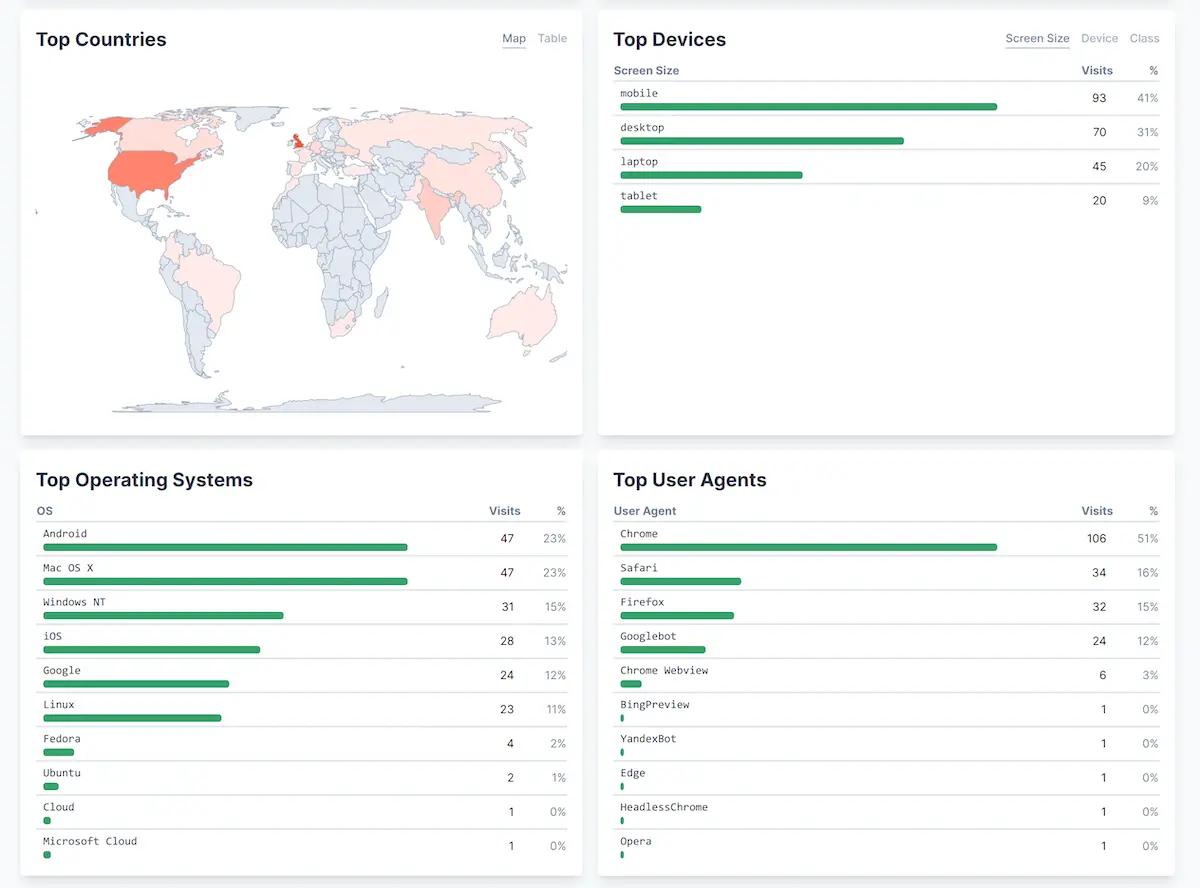
In theory, the need for tracking-free usage statistics could be solved by CloudFront logs but they are not really built for the kind of use case I had in mind. I would like to see pretty graphs on how many users there are, what country they are from, what pages are popular, and maybe if they are using a mobile or desktop to browse. So, I decided to look for a service that was specially built for this. It was of outmost importance, however, that this solution maintained privacy of my users and therefore popular services like Google analytics were out of question. I ended up settling with Beampipe.io [5] for that reason, and for its easy installation. Below is an example screenshot of the Beampipe dashboard.
Deployment
Update: Since I originally wrote this post, I have made some changes to the deployment process. Although the original way to solve it worked quite well, it did feel a bit awkward that the release process were totally detcoupled from the version control. This decoupling meant that I could not look into my version control system in order to determine what the latest version of my blog is. It also means that I had to do some slight double work when I were done, both running the deploy script and perform a git push. Admittedly, not the largest effort in the world, but an inconvenience none the less.
What I did instead was that I used the AWS service Code Pipeline, that out of the box integrates to GitHub, to automatically build and deploy any changes that are pushed to the main branch of the repository that is hosting this source code. Aside from the obvious, that I could get rid of the complicated deploy script, that this is best practice and automation is amazing and what not, this also comes with the totaly awesome benefit that I am now able to write blog post on my iPad, even though it is based on an SSG. This is due to the fact that GitHub makes it possible to edit your repo online via Visual Studio code. Even before, it was of course possible to edit the blog from the iPad, however, in order to deploy the changes, I would still have to go to the computer to do the deply. A step that I do not need any more.
Original:
When I think about it, the only thing in the entire stack that is a bit complicated is the deployment process. Because I know that I will forget the steps involved between deploys, I wanted to script it. Which in and of itself should not be that difficult, it is just a matter of running the build-command in Hugo and then the aws-cli for uploading the build artifact. In practice however, this got a little bit more complicated as my AWS account uses MFA for authentication, something that my script would have to take into consideration. In the end, the easiest solution was to combine a bash and python script like this:
deploy.sh
#!/bin/bash


# rebuild the project
echo "Removing old build folder"
rm -rf build
hugo -D

echo "============ Build complete ============"
echo
echo "Enter MFA code:"
read MFACODE
echo
echo "Fetching credentials..."
echo

# Fetch credentials to use during this deploy
aws sts get-session-token \
  --serial-number <arn–of–cli-user> \
  --duration-seconds 900 \
  --token-code $MFACODE \
  --profile <name-of-cli-profile> | jq > temporary-credentials.json

# Extract the credentials into envirionment variables
python3 extract_credentials.py
source .env

# Upload the artifact
echo "Upload artifact..."
echo
aws s3 cp build s3://<bucket-name> --recursive --exclude ".DS_Store"
echo
echo "Upload complete!"
echo

echo "Cleaning up"
echo
# Unset temporary credentials
unset AWS_ACCESS_KEY_ID
unset AWS_SECRET_ACCESS_KEY
unset AWS_SESSION_TOKEN

# Cleanup temporary files
rm .env
rm temporary-credentials.json

echo "Cleanup complete!"
echo "All done!"
extract_credentials.py
import json

with open('temporary-credentials.json') as f:
  credentials = json.load(f)['Credentials']

keyId = credentials['AccessKeyId']
secretKey = credentials['SecretAccessKey']
sessionToken = credentials['SessionToken']

with open('.env', 'w+') as f2:
  f2.write('export AWS_ACCESS_KEY_ID={}\n'.format(keyId))
  f2.write('export AWS_SECRET_ACCESS_KEY={}\n'.format(secretKey))
  f2.write('export AWS_SESSION_TOKEN={}\n'.format(sessionToken))